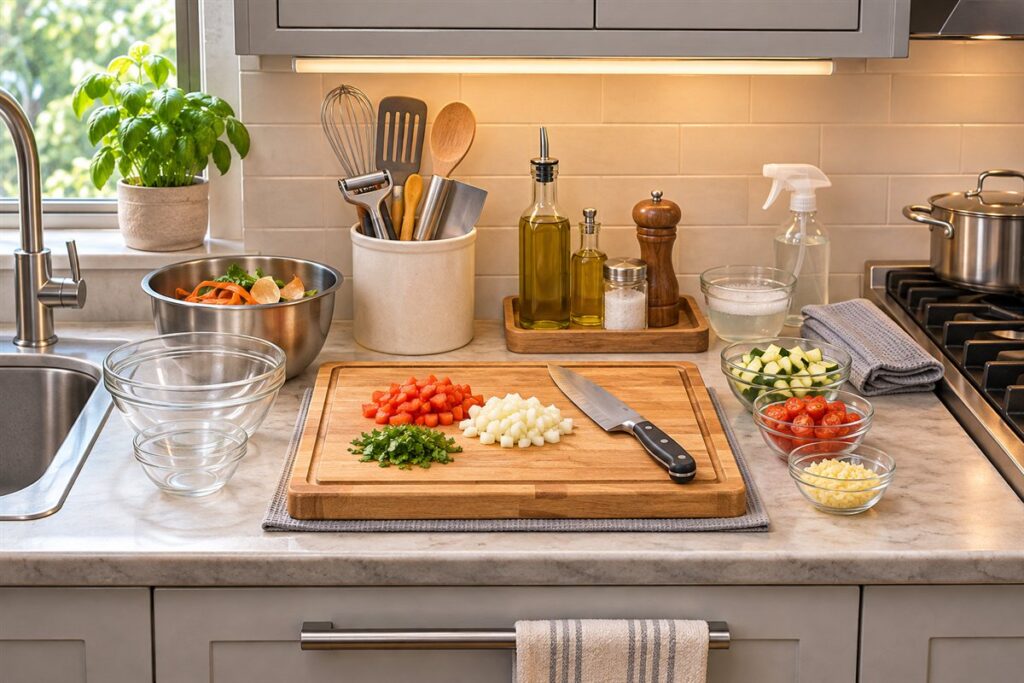
A prep station is the part of your counter where you chop, measure, and mix. Setting it up well means placing a stable board, a few bowls, a trash bowl, and your most used tools within easy reach. The result is faster prep, fewer spills, and a cleaner kitchen.
Find the Right Spot
Choose a stretch of counter between the sink and the stove if you can. You want enough room for a full-size board and a bowl on each side. The surface should be at a comfortable height so your shoulders stay relaxed, and the lighting should be bright enough to see what you are cutting.
Step by Step Setup
- Clear the counter. Move small appliances and mail out of the way.
- Anchor the board. Place a damp cloth or a non-slip mat under the cutting board so it cannot slide.
- Add a scrap bowl. Keep a bowl or a compost pail on the counter to cut down trips to the bin.
- Arrange bowls. Put empty bowls on one side and filled prep bowls on the other, working in a single direction.
- Place tools nearby. Keep your knife, peeler, measuring tools, and a bench scraper in a crock or tray.
- Add a wash-up spot. Keep a cloth and a small dish of soapy water or a spray bottle nearby for quick cleanups.
Layout Reference
| Position | What to place | Reason |
|---|---|---|
| Center | Cutting board | Main work area |
| Dominant side | Scrap bowl | Quick disposal |
| Opposite side | Empty bowls | Receive prepared food |
| Behind | Tool crock, oils, salt | Within reach, out of the way |
Food Handling and Safety
- Use separate boards for raw meat and ready-to-eat foods, or wash the board thoroughly between uses.
- Wash hands before and after handling raw ingredients.
- Keep knives sharp and handle them with care. Follow the maker’s guidance on use and storage.
- Wipe the counter between tasks, and consult official food-safety guidance on cleaning surfaces.
Small Kitchen Tips
If you lack counter space, lay a board across the sink or use a pull-out shelf. A rolling cart can serve as a movable prep station that stores away when you finish. Work from left to right or right to left, whichever suits your hands, and keep the flow consistent.
Cutting Board Materials Compared
The board is the heart of a prep station, and the material shapes how it feels and how long it lasts. Wood boards are gentle on knife edges, look attractive and can be refinished, but they need hand washing, regular drying and occasional oiling according to the maker’s guidance. Plastic boards are light, usually dishwasher safe in many cases, and often color-coded for different foods. They can develop deep knife marks over time that are harder to clean, so replace them when they are badly scarred.
Bamboo boards are hard and widely available, though some find them tougher on knife edges. Composite boards, made of pressed fibers and resin, are durable and often dishwasher friendly, but check the maker’s temperature limits. Glass, stone and ceramic boards are easy to clean but dull knives quickly, so most cooks avoid them for cutting.
- Choose a board big enough that ingredients do not tumble off.
- Look for a thickness that resists warping.
- Check for a non-slip base or add a mat.
- Consider a juice groove for meats and fruits.
Many cooks keep at least two boards, one for raw meat and fish and another for produce and ready-to-eat foods. Read the product listing for care instructions and sizing before buying.
Lighting, Counter Height and Comfort
A prep station that is cramped or dim wears you out and invites mistakes. Lighting is the first issue. Overhead lighting often casts your own shadow on the board, so add task lighting, such as under-cabinet lights, that shines on the work area from the front or side. Bright, even light helps you see cut lines and fine details like seeds, bones and bruises on produce.
Height is the second. A counter that is too low forces you to hunch and strains your lower back, while one that is too high lifts your shoulders. A common guideline is that your forearms should be roughly level when your hands rest on the board. If the counter is too low, a thicker board or a stable riser can help. If it is too high, a sturdy stool or platform to stand on can help, but make sure it is secure.
- Stand with feet apart and your body slightly angled to the counter.
- Use an anti-fatigue mat if you stand for long periods.
- Take short breaks and stretch if you prep large batches.
Comfort also means enough elbow room, so the work area should not be pinned between appliances. If you share the kitchen with someone else, leave space for both of you to move around.
Bowls, Trays and Containers for Prepped Food
How you hold prepped ingredients affects speed and cleanliness. Nesting bowls in several sizes save space and suit everything from garlic to chopped onions. Choose bowls that are stable and not too light to slide. Stainless steel is durable and light. Glass lets you see contents and can often go in the microwave. Small ramekins or prep bowls work for spices and measured ingredients.
Sheet pans or trays can hold prepped items for a recipe in one place, which makes it easy to carry ingredients to the stove. Group by when they go in the pan, such as aromatics together and liquids separate. A bench scraper moves piles of cut vegetables from the board into bowls quickly and safely, without exposing the blade of a knife.
- Keep one large bowl for scraps, and a smaller one for items to compost.
- Use lidded containers for prepping ahead and storing in the fridge.
- Keep a damp cloth for wiping your hands and the board between tasks.
Check care instructions for each material, including microwave and dishwasher suitability. Fewer, versatile pieces are better than a large collection that clutters the counter. Choose items that you will wash and reuse every day.
Planning Prep Order and Mise en Place
A well-run prep station depends on the order you work in. Read the recipe from start to end before cutting anything, and note what must be prepared first, what can wait and what shares a bowl. A common approach, called mise en place, is to prepare and measure all ingredients before cooking begins. This is especially helpful for fast recipes like stir-fries, where there is no time to chop mid-cook.
Sequence your tasks to limit cleanup. Start with dry, clean items and ingredients that can sit, such as aromatics and herbs, before moving to wet or messy ones. Prepare vegetables before raw meat or fish if you can, so you do not need to wash the board in between. If you must switch, wash the board, knife and your hands thoroughly, and consult official food-safety guidance.
- Measure spices into small bowls so they are ready to add.
- Keep things that go in the pan together in the same bowl.
- Leave long-cooking items for last if they are going into the pot first.
For slow recipes, you can prep as you go, chopping while something simmers. Judge by the recipe. The goal is to avoid scrambling at the stove, burning garlic while you search for a lemon.
Cleaning as You Work and Resetting the Station
Good habits at the prep station keep the whole kitchen cleaner. Wipe the board between tasks, particularly after handling raw meat, fish or eggs. Keep a small bowl of hot soapy water or a spray bottle and cloth handy for quick wipe-downs. Use separate cloths for different tasks if possible, and wash them regularly. Wash your hands often, particularly when moving between raw and ready-to-eat foods.
Knives deserve special attention. Wash them separately by hand, drying immediately, and avoid leaving them in a sink full of soapy water where they might injure someone. Return knives to their storage place when you finish, with the edge protected.
- Clear scraps into the scrap bowl as you go, so the board never fills with debris.
- Use a bench scraper to sweep crumbs and bits off the counter.
- Fold damp towels so they do not drip onto the floor.
When you finish, reset the station for next time. Wash and dry the board, put tools back in their crock, empty the scrap bowl and wipe the counter. A two-minute reset means the next cook, you or someone else, starts with a clean, ready workspace. Over time, this routine becomes automatic.
FAQ
How big should the cutting board be?
Big enough to hold your ingredients without crowding, yet small enough to fit your sink for washing. Many cooks use one large board and one small one.
Should I prep everything before cooking?
Prepping main ingredients first is a good habit for recipes with fast steps. For slow recipes, you can prep while things cook.
What is the best cutting board material for a prep station?
Wood and plastic are the most common. Wood is gentle on knives, and plastic is easy to wash. Many cooks keep one of each.
How do I stop a cutting board from warping?
Dry it completely after washing, avoid soaking it, and follow the maker's care instructions. Store it flat or on its edge in a dry spot.
What does mise en place mean?
It is a French phrase for having ingredients prepared and in place before cooking. It reduces stress during fast recipes.
Do I need more than one board?
It is useful to have at least two, one for raw meat and fish and one for produce and ready foods. Wash all boards thoroughly after use.
How can I make a prep station work in a rented kitchen?
Use removable solutions such as a cart, a tray, a clamp-on light and a mat under the board. They add function without altering the space.
How do I keep my prep area from getting messy?
Use a scrap bowl, wipe between tasks and clear finished ingredients into bowls. A bench scraper helps move items quickly.
Is an anti-fatigue mat worth it?
It can help if you stand for long periods. Choose one that is stable and does not curl at the edges.
The Short Version
Create a stable work zone with a board, scrap bowl, and tools close at hand. Work in one direction, keep raw and ready foods apart, and wipe as you go.