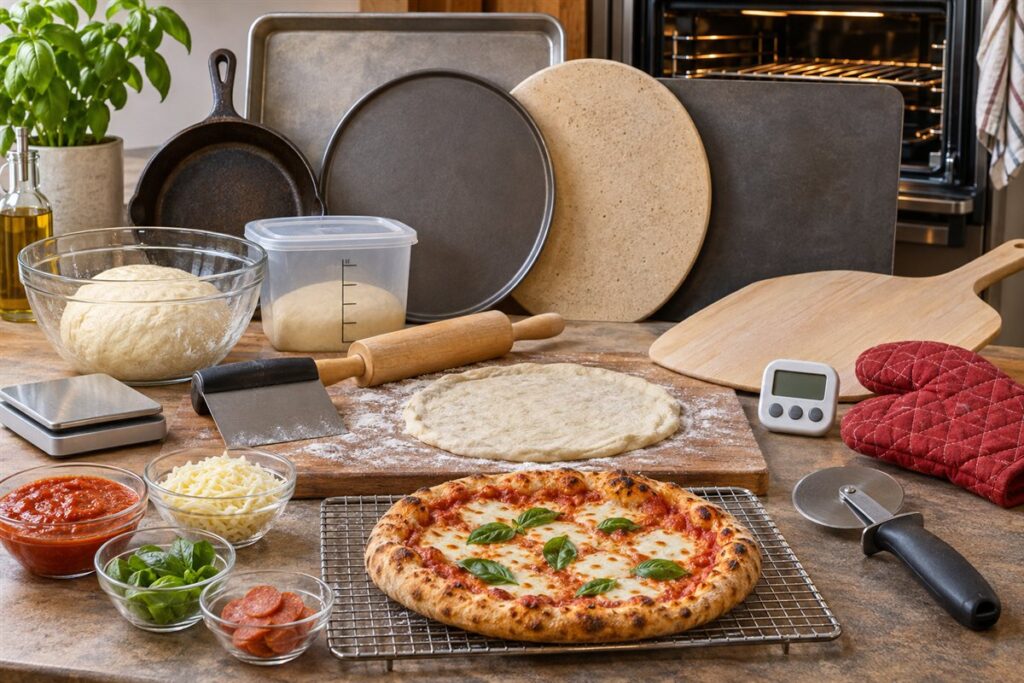
Homemade pizza needs tools for four jobs: making dough, shaping it, baking it hot, and cutting it. You can get good results with a sheet pan and a home oven, and a few extras can improve the crust. Here is how each tool fits into the process.
Making and Shaping Dough
- A large bowl and a scale. Weighing ingredients helps you repeat a recipe you like.
- A bench scraper. Divides dough and cleans the counter.
- A rolling pin. Optional, as many people shape dough by hand.
- A floured board or parchment sheet. Gives you a surface for stretching and topping.
- A covered container. Lets dough rise or rest in the fridge, as your recipe directs.
Baking Surfaces
| Option | How it helps | Notes |
|---|---|---|
| Sheet pan | Easy and widely available | Good for thicker crusts |
| Round pizza pan | Even shape | Check the maker’s care guide |
| Baking stone | Holds heat for a crisp base | Preheat as the maker advises |
| Baking steel | Transfers heat quickly | Heavy, so handle carefully |
| Cast iron skillet | Gives a deep, crisp base | Very hot, use mitts |
Moving and Cutting
- A pizza peel. A wooden or metal paddle slides pizza onto a hot surface. Parchment can help if you have no peel.
- A wire rack. Lets the crust rest without getting damp.
- A pizza wheel or large knife. Cut with care on a board, never directly on a stone or steel.
- Oven mitts. Required for anything near a hot oven.
- A timer. Baking times vary with your oven, recipe, and thickness, so watch the pizza near the end.
Baking Tips
Preheat your oven and baking surface fully, which can take a good while. Check your oven manual for maximum temperatures and any guidance about stones or steels. Many home recipes call for a very hot oven, but the right setting depends on your oven. Use a thermometer to check that the oven matches the dial. If your toppings include raw meat, cook it thoroughly, and look to official food-safety guidance for doneness.
Topping and Serving Tips
Keep toppings in small bowls within reach so you can build quickly, because dough left sitting with wet toppings can stick. Use light amounts so the crust bakes well. Let the pizza rest for a minute or two on a rack before cutting, and use a board that can handle the heat. Slice with care and serve right away for the best texture.
Stone, Steel, or Pan: Picking a Baking Surface
The surface under your pizza affects crust texture, so it helps to understand the trade-offs. A baking stone is usually made of ceramic or similar material. It absorbs heat and releases it steadily, giving a crisp base. It needs a long preheat and can crack if shocked by sudden temperature changes, so follow the maker’s guidance on heating and cleaning, and never use soap on porous stone unless the instructions allow it.
A baking steel is a flat plate of metal that conducts heat quickly. It tends to be heavy and durable, but you must handle it with care when moving it in and out of a hot oven. Many users like the speed of heat transfer, though results depend on your oven. A heavy sheet pan, a cast iron skillet, or a pizza pan is a budget-friendly start, and an upside-down sheet pan preheated in the oven can serve as a makeshift surface.
Check dimensions before you buy. The surface must fit your oven with room for air to move, and it needs to suit the size of pizza you want to make. Read your oven manual about placing heavy items on racks or the oven floor, and confirm the rack can bear the weight.
- Preheat the surface for the time the maker recommends.
- Use mitts rated for high heat.
- Let the surface cool fully in the oven before cleaning or moving it.
Peels, Boards, and Getting Pizza Into the Oven
Moving a topped pizza from counter to hot surface is the trickiest step. A peel is a flat paddle that slides under the pizza. Wooden peels are thicker and grip flour well, which helps dough release, while thin metal peels slide under finished pizza easily. Some cooks keep one of each. Choose a size slightly smaller than your baking surface so you can maneuver it. Prepare the peel with a dusting of flour, semolina, or cornmeal as your recipe suggests, and build the pizza quickly, because dough sitting on a peel with wet toppings can stick. Give the peel a shake before you load toppings to confirm that the dough moves freely. Slide the pizza off with a quick, level motion.
If you do not have a peel, parchment paper on a flat board or an upside-down sheet pan can work. Check the parchment’s heat rating on the package, and trim overhanging edges so they do not touch the oven element. Never leave paper where it can ignite.
A second board for cutting is useful, so you are not slicing on your hot surface. Choose one that tolerates heat and does not slip. Keep a spatula or tongs handy for rescuing stray toppings.
Dough Handling Gear and Fermentation Setup
Good pizza often starts well before the oven, with dough that has had time to develop. Mixing bowls with lids or covers, a straight-sided container, or individual dough boxes help you proof dough safely. A container with measurement marks makes it easy to see how much the dough has grown. Cover dough so the surface does not dry out, and follow your recipe for rise times, which depend on temperature. A scale is the single most useful tool for repeatable dough because flour, water, salt, and yeast are measured by weight. A bench scraper divides dough into balls and scrapes the counter clean. Light oil or flour on the container prevents sticking. If your kitchen is cold, place dough in a slightly warmer spot, such as inside an oven that is turned off, and take care to remember it is there before you turn the oven on.
Cold fermentation in the refrigerator is popular because it gives flavor and flexibility in timing, but it takes planning and fridge space. Check that your container fits on a shelf. Let chilled dough warm up as your recipe says before shaping, since cold dough springs back.
- Use a thermometer to check room temperature if rise times vary.
- Keep yeast fresh and stored according to the package.
- Shape gently to keep air bubbles in the dough.
Oven Limits and Making the Most of a Home Oven
A standard home oven cannot match the heat of a dedicated pizza oven, yet it can bake very good pizza with the right approach. Preheat for longer than you think, and use a thermometer to check that the oven matches its setting. Position the rack according to your recipe and oven design; some cooks prefer a higher rack for faster browning, others the middle. Check your oven manual for maximum temperature and for any notes about preheating heavy surfaces. Self-cleaning cycles run hotter than normal baking temperatures, so do not use them with a stone or steel inside unless the maker says it is safe. Keep the oven door closed as much as possible to hold heat.
Dedicated outdoor pizza ovens are available, but they have their own rules for fuel, ventilation, and safe placement. If you consider one, read the maker’s instructions and local regulations, and never use one indoors or in a closed space. Limit toppings, since heavy toppings and wet ingredients cool the pizza and make the base soggy. Pat wet items dry, and cook raw meat thoroughly beforehand or as directed by official food-safety guidance. Rotate the pizza partway through baking if your oven has hot spots. Take the pizza out when the crust and cheese look right, as times vary.
Cutting, Serving, and Cleanup
A rocker blade, a pizza wheel, or a sharp chef’s knife can cut a pizza cleanly. Use a cutting board that can handle heat and avoid cutting on the baking stone or steel, which can damage both the tool and the surface. Rest the pizza on a rack for a minute so steam escapes and the crust stays crisp, and then slice. A large spatula helps lift slices. For serving, use a board or a plate large enough for the pizza, and keep a stack of napkins nearby. If you bake several pizzas, keep finished ones on a rack in a warm oven set at a low temperature, if your oven manual allows it, rather than stacking them.
Cleanup deserves attention. Brush crumbs and loose flour off the stone or steel once they have cooled, and follow the maker’s cleaning advice. Stones can stain, which is normal. Steel may need light oiling to prevent rust, depending on the type. Wash peels and boards by hand if they are wood, and dry them thoroughly.
- Never clean a hot surface with cold water.
- Store stones and steels where they will not be knocked or dropped.
- Replace a cracked stone rather than using it.
FAQ
Do I need a pizza stone?
No. A preheated sheet pan upside down can work well. A stone or steel can improve crispness but is not required.
How do I stop the dough from sticking to the peel?
Use a light dusting of flour or semolina, build the pizza quickly, and give the peel a gentle shake before sliding. Parchment is a handy backup.
What is the difference between a baking stone and a baking steel?
A stone absorbs and releases heat steadily and is often ceramic, while a steel is metal and transfers heat quickly. Both need a long preheat and careful handling. Check the maker's instructions for use and cleaning.
Can I use parchment paper on a hot surface?
Many cooks do, but check the paper's heat rating on its package. Trim overhanging edges away from the oven element and never leave paper where it could catch fire.
How long should I preheat for pizza?
It depends on the surface and your oven, so follow the maker's guidance. Heavy stones and steels usually need longer than a sheet pan. An oven thermometer helps confirm the temperature.
Why is my crust soggy in the middle?
Heavy or wet toppings, too little preheating, or too thick a layer of sauce can all contribute. Use lighter toppings, pat wet items dry, and make sure the surface is fully heated.
Is cold fermentation necessary?
No. Many recipes work with a same-day rise. Cold fermentation adds flexibility and flavor but needs fridge space and planning. Follow your recipe.
Can I use a self-cleaning cycle with a stone inside?
Usually not. Self-clean cycles run hotter than normal baking, and the stone or steel could be damaged. Check your oven manual and the maker's notes.
The Short Version
You need a bowl, a surface to bake on, a way to move the pizza, and a cutter. A sheet pan works fine, and a stone or steel is an upgrade. Use mitts and follow your oven manual.