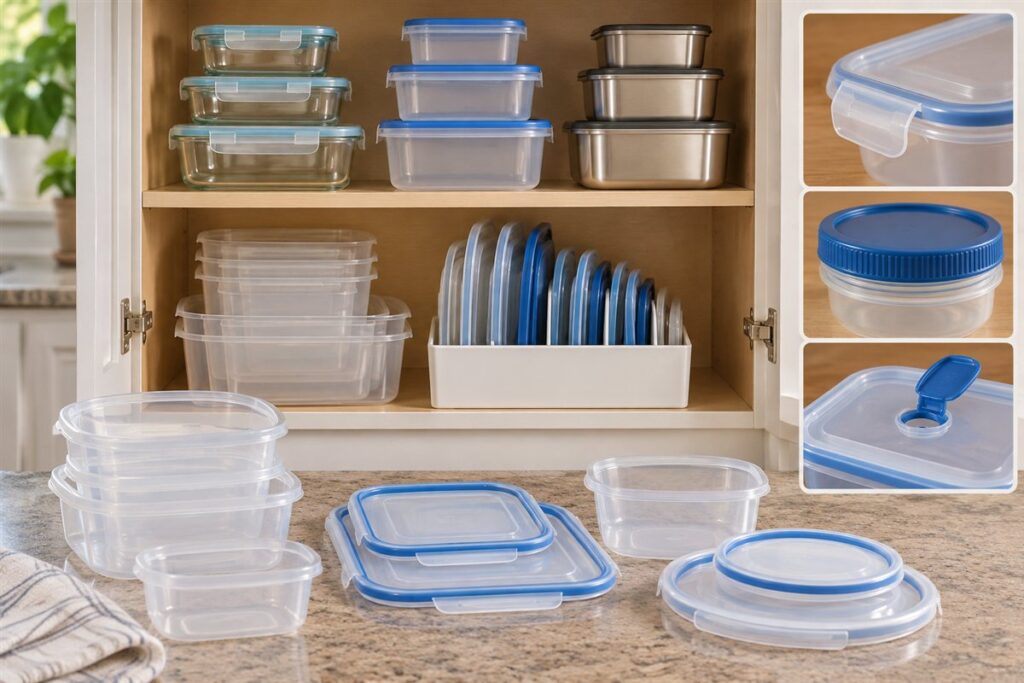
To organize food storage containers, match every lid to a base, discard orphans, and store the sets nested with lids alongside. Fewer, uniform containers are easier to manage than a big mixed collection. Use the steps below to tame the cabinet.
Sort and Match
- Pull every container and lid out of the cabinet and spread them on the floor or table.
- Match each lid to its base. Set aside any piece without a partner.
- Check condition. Cracks, warping, deep stains, or lids that no longer seal are worth replacing.
- Look at the maker’s guide for each item to see whether it can go in the microwave, freezer, or dishwasher.
- Recycle or donate pieces you do not need, following local recycling rules.
Choose a Storage Layout
There are several ways to keep containers neat. Choose the one that matches your cabinet.
- Nest bases, stand lids. Stack bases by size and keep the lids upright in a file organizer or a bin.
- Store sets together. Put the lid on each container and stack. This keeps pairs together but takes more room.
- Use a drawer. A deep drawer lets you see everything at once, with bases on one side and lids on the other.
- Adopt one shape. Containers of one or two shapes stack neatly and are simple to match.
Compare the Options
| Layout | Pros | Cons |
|---|---|---|
| Nested bases, separate lids | Compact | Lids can slide around |
| Assembled sets | Pairs stay together | Takes more space |
| Deep drawer | Easy to see all pieces | Needs drawer space |
Daily Use Habits
- Label containers with the food and the date before putting them in the fridge or freezer.
- Let hot food cool a little before sealing it, then refrigerate promptly. Use official food-safety guidance for how long leftovers keep.
- Dry containers fully before storing so odors and moisture do not build up.
- Keep a short list of what is in the freezer on the door.
A Quick Monthly Reset
Containers drift back into disorder with daily use. Once a month, take five minutes to pull the stack forward, match any stray lids, and remove pieces that have cracked or lost their seal. Keeping a basket for lids on the counter near the dishwasher also helps, because it gives them a home right as they come out of the wash.
Glass, Plastic and Stainless Steel Compared
The material of your containers decides how they behave in the fridge, freezer, microwave and dishwasher, so it is worth knowing the tradeoffs. Glass containers do not stain or hold odors easily, let you see the contents, and many are made for oven or microwave use. They are heavier, can break if dropped, and may be sensitive to sudden temperature changes, so follow the maker’s guidance on moving between freezer, oven and counter.
Plastic containers are light, resist breakage and are usually inexpensive in relative terms. They can stain from tomato-based foods, absorb odors over time and warp in high heat. Check the packaging for microwave and dishwasher suitability, and look at the recycling or material markings if you have questions. Stainless steel is durable and light, does not stain, and is good for lunches and travel, though it cannot go in the microwave, and you cannot see inside.
- Glass: good for reheating and storing strong-smelling foods.
- Plastic: good for portability and kids’ lunches.
- Stainless steel: good for cold storage and durability.
Many households use a mix. Whatever you pick, read the product listing for lid material, because the lid is often the part that wears out first. Choose a material that suits the way you actually reheat and carry food.
Lid Seals, Latches and Leak Resistance
The lid determines whether a container is truly useful. Snap-on lids are simple and compact, but may not seal against liquids. Lids with silicone gaskets and latches provide a tighter seal that can handle soups and sauces, at the cost of more parts to clean and keep track of. Screw-top containers suit liquids and are common for jars, but take longer to open and close.
Check how the lid works before buying a set. Test whether it closes with a clear click or seal, and whether the gasket can be removed for washing. Gaskets that cannot be removed can trap moisture and odors. Vented lids are meant for microwave reheating, and may have a flip-up vent. Follow the maker’s instructions on whether to open the vent before heating.
- Do not assume that a container labeled airtight is leakproof for liquids. Check the description.
- Inspect gaskets for cracks, stretching or discoloration.
- Replace lids that no longer close tightly, or ask the maker whether replacement lids are sold.
If you carry food in a bag, test a new container with water first to check for leaks. A little time spent here saves cleaning up a spill later.
Sizing and Shape for Your Household
Having the right sizes is often more important than having many containers. Think about what you store most. Single-serve leftovers, meal-prep portions, bulk dry goods and soups each suit different sizes. Small containers hold sauces, cut fruit and snacks. Medium ones suit individual meals. Large ones hold batch-cooked dishes, salads or baking ingredients.
Shape affects how well containers use space. Square and rectangular containers pack more efficiently in the fridge and freezer than round ones, which leave gaps. Round containers, on the other hand, are easier to clean in the corners and good for soups. Containers that nest when empty save cabinet space, but stackable ones with flat lids save space when full.
- Measure your fridge shelves and freezer drawers before buying a large set.
- Pick a few shapes that stack together instead of many different ones.
- Consider tall, narrow containers for the door shelves.
When you buy a set, check the capacity listed, since the usable volume is less than the total volume once headspace is allowed. For freezing liquids, leave extra room at the top for expansion. A smaller number of well-chosen sizes keeps matching simple and prevents duplicate purchases.
Cleaning Stains, Odors and Warped Lids
Containers pick up marks over time, and how you clean them extends their life. Wash soon after use and do not let food dry on. For hand washing, hot soapy water and a soft sponge usually work. Check the maker’s guide before using the dishwasher, and place plastic items on the top rack unless the instructions say otherwise. Lids with gaskets should be taken apart so trapped moisture can dry.
Stains from tomato-based foods are common on plastic. Rinsing promptly helps, and some people find that a paste of baking soda and water loosens residue, followed by thorough rinsing. Sunlight may lighten some stains, though effectiveness varies. Avoid harsh abrasives that scratch, as scratches trap food and bacteria. For odors, airing containers open and dry, or using a mild vinegar and water rinse, can help, but if smells remain, replacement may be best.
- Do not microwave empty containers or use them above the maker’s temperature limit.
- Do not put hot glass into cold water.
- Discard containers that are warped, cracked, or deeply scratched.
When in doubt about whether a damaged container is still safe for food, replace it. A fresh container costs little compared to the food you might lose.
Freezer and Pantry Storage Rules
Containers play different roles in the freezer and pantry, and choosing the right type avoids waste. For the freezer, use containers marked as freezer-safe, with tight lids, and leave headspace for expansion. Flat, stackable shapes use space well. Cool food before freezing, and label each container with its contents and date. Check guidance on how long different foods keep in the freezer.
Freezer burn happens when air reaches the food, so choose containers that fit the amount of food, with little extra space. For irregular items, a freezer bag pressed flat may be better than a container. Some people freeze portions in a muffin tin or tray first, then move the frozen blocks to a bag or container.
In the pantry, airtight containers keep dry goods such as flour, rice, cereal and pasta fresh and protected from pests. Choose containers with wide mouths for scooping and clear sides so you can see levels. Keep original package details, such as cooking instructions and best-by dates, by taping them to the container or writing them on a label. Group containers by category, and keep older items toward the front so they get used first.
- Never mix new and old stock in the same container without checking the dates.
- Clean pantry containers fully before refilling.
FAQ
How many containers do I need?
That depends on how much you cook ahead. Many households do well with a modest set in two or three sizes. If you have more than you can store neatly, it may be time to thin the pile.
What do I do with stained or smelly containers?
Wash them well and air them out, and follow the maker’s cleaning advice. If a stain or odor remains, consider replacing the piece.
Are glass containers better than plastic?
Neither is better for everyone. Glass resists stains and odors but is heavier and breakable, while plastic is light and portable but may stain or warp.
Can I put hot food straight into a container?
Let very hot food cool a little first, then refrigerate promptly. Follow the container maker's heat guidance and food-safety advice.
How do I know if a container is freezer safe?
Look for a freezer-safe marking on the product or packaging. If there is none, check the maker's website or manual.
Why do lids warp in the dishwasher?
Heat can soften some plastics. Place lids on the top rack away from the heating element, or hand wash if the maker advises.
Should I keep containers I rarely use?
Keep sizes you use regularly. A container that has not left the cabinet in a year may be a candidate for donating or recycling.
How many containers should I own?
It depends on how much you cook ahead. Enough for a few days of leftovers plus a few for the freezer is a reasonable starting point.
The Short Version
Match lids to bases, remove orphans and damaged pieces, and store containers nested with lids upright or in a drawer. Label what you store and follow food-safety guidance for leftovers.