To organize kitchen drawers, empty each one, sort the contents, group items by task and give every group a home with dividers or trays. The goal is to find what you need in a few seconds. A single afternoon is usually enough for the main drawers.
Step-by-Step Plan
- Choose one drawer at a time so the job stays manageable.
- Take everything out and wipe the inside with a damp cloth.
- Sort items into three piles: keep, move elsewhere, and donate or discard.
- Group the keep pile by task, such as baking, cutting, serving or stirring.
- Measure the drawer, then choose trays and dividers that fit.
- Place the most-used items at the front and the rare ones at the back.
Zones That Work
| Drawer | What goes in | Tip |
|---|---|---|
| Near the stove | Spatulas, spoons, tongs, ladles | Stand tall tools in a crock if you have counter space |
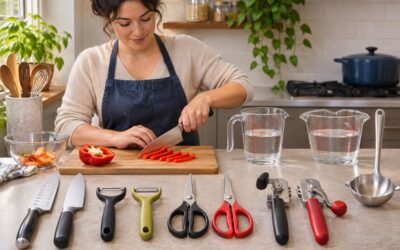
| Near the prep area | Peeler, measuring tools, scissors | Keep a small tray for each group |
| Cutlery drawer | Forks, spoons, table knives | Use a tray with compartments |
| Baking drawer | Rolling pin, cutters, piping tools | Use shallow bins for small items |
| Everything else | Foil, wraps, bags, lids | Group by type and stand boxes upright |
Handling Sharp Tools
Do not leave loose knives or peelers in a drawer where hands reach in blind. Use a knife tray, in-drawer block or blade guards, and keep blades dry. Store sharp items away from children’s reach, following the maker’s safety advice.
Dividers and Tools to Consider
- Adjustable bamboo or plastic trays that expand to fit.
- Non-slip liners to stop items from sliding.
- Small bins for loose bits such as cake toppers and skewers.
- Drawer organizers with tall sides for deep drawers.
Keeping It Tidy
- Return items to their spot after each use.
- Check each drawer every few months and remove duplicates.
- Do not overfill; if the drawer will not close smoothly, remove a few things.
- Label with a small tag if several people share the kitchen.
Quick Wins
If you only have ten minutes, begin with the drawer you open most. Remove duplicates, put similar items together and move rarely used items to a higher shelf. Even this small change makes cooking smoother, and it builds momentum for the next drawer.
Finishing Touches
Once everything has a place, test the setup during a real cooking session. Notice where you reach and what slows you down, then adjust the layout. Small tweaks, like moving the peeler closer to the bin, often matter more than new organizers.
Measure and Plan Before You Buy Anything
The most common drawer-organizing mistake is buying containers before checking the space. Measure the inside width, depth and height of each drawer, noting any rails, hinges or sloped sides that reduce the usable area. Record the numbers on paper or your phone. Measure the inside, not the front, because drawer fronts and runners take up room that is not available for storage.
Next, think about what you will store. Pull out the items and arrange them on the counter in the layout you imagine. Take a photo, or sketch the plan, so you can follow it when you put things back. Check the height of tall items such as ladles and whisks, since they may stop the drawer from closing if they stand upright. Decide whether you want a fixed layout or a flexible one that you can change as your needs shift.
Start with what you have. Many households already own small boxes, trays and baskets that fit a drawer. Try these before spending money, then fill the gaps with purpose-built organizers. Buy a single organizer first and test it for a week or two. If the layout works, add more. If you buy a full set at once and it does not suit you, you may end up with unused pieces and wasted money.
Types of Organizers and Who They Suit
Several types of organizers exist, and each has strengths. Expandable trays adjust to different drawer widths and suit utensils and cutlery. Fixed trays have preset compartments and look neat but only fit certain drawer sizes. Individual bins and boxes can be arranged in any pattern, which suits odd collections. Drawer dividers, often thin panels that slot in or press against the sides, create sections without taking up much space.
Materials vary. Bamboo and wood give a warm look and are sturdy, but they can absorb moisture and need to be wiped carefully. Plastic is light, easy to clean and often cheaper, though thin pieces may crack or slide. Metal organizers can be sturdy and sleek, and silicone liners keep items from sliding. Choose a material that matches your cleaning habits and the weight of what you store.
- Expandable trays: flexible, good for varied drawers.
- Fixed trays: tidy, best when drawer size matches.
- Bins and baskets: good for loose items and uneven sets.
- Dividers: useful for deep drawers and large items.
Consider whether organizers can be removed for cleaning. Tall sides help in deep drawers, while low profiles save height. Check any stated weight limits.
Zoning by How You Actually Cook
A sensible layout follows your habits. Think about the paths you take while cooking. The tools you use at the stove should be close to it, the items you use for prep should be near the work area and the things you use for serving should be near the table or dishwasher. Observe yourself for a few days and note which drawers you open most. Those deserve the best spots.
Group items by task, not by type. A baking drawer might hold measuring spoons, a whisk, a spatula and a rolling pin together. A prep drawer might include a peeler, a zester and scissors. Placing related tools together saves time and reduces searching. Keep daily items at the front or the top, and relegate rarely used items to the back, a higher shelf or another room.
Take account of the people who use the kitchen. Children may need access to plates and cups in a low drawer. Left-handed cooks might prefer a different arrangement. If several people share, keep the layout simple and labeled. Revisit the layout after a few weeks and adjust, since the first setup may not match how you really work. A flexible approach lets you improve it over time.
Awkward Items and Deep Drawers
Some items refuse to behave. Long tools like rolling pins and wooden spoons can be stored on their sides or in a tall container. Bulky items such as graters and colanders may be better in a cabinet. Small, loose items like skewers, cake toppers and piping tips need small bins or pouches, so they do not scatter across the drawer. Magnetic strips inside a drawer lid can hold metal items in some designs, but check the weight limit.
Deep drawers suit pots, pans and lids. Use vertical dividers to hold baking sheets and cutting boards on their edges, and use a lid organizer or a rack to keep lids in order. A non-slip liner prevents sliding and reduces noise. Stack with care, since heavy items on top of lighter ones can make the drawer difficult to open.
Think about the weight of the contents, as heavy items can strain runners. Check that the drawer slides smoothly before and after loading it. If it sticks, remove some items or check the runners. Avoid storing sharp tools loosely; use a tray or sheath, and keep blades dry. If an item is used once a year, store it elsewhere to free space for daily tools. This makes the whole kitchen more efficient.
Maintaining Order Over Time
An organized drawer stays that way only with some upkeep. Build simple habits, such as returning things to their place after washing and putting new items in the right zone. If a drawer starts to overflow, remove something before adding more. A quick sweep each week, taking a minute to straighten utensils, prevents clutter from building.
Schedule a seasonal check. Every few months, open each drawer and remove duplicates, broken items and tools you no longer use. Wipe the inside with a damp cloth and dry it. Look at the organizers for cracks, mold or sticky residue, and clean or replace them. Notice what you reach for and what sits untouched, and adjust the layout to match. This also helps you spot items that have migrated from their usual spot.
Involve everyone in the household. A short conversation about where things go helps keep the system working. Labels can help, particularly on shared drawers. If something is constantly out of place, consider whether its home is in the wrong spot. The best arrangement is the one people actually follow, so be willing to change the plan. Small tweaks often matter more than a complete reorganization.
FAQ
Do I need to buy organizers first?
No. Empty and sort first, then measure. You may find boxes you already own work well.
How many utensils are enough?
Keep what you use weekly. Extra duplicates can go in a back drawer or be given away.
How do I organize a very shallow drawer?
Use low-profile trays and store flat items such as measuring spoons, peelers and small tools. Keep bulky items elsewhere.
What can I use if I do not want to buy organizers?
Try small boxes, jars, mugs or cardboard dividers you already have. Test the layout before buying anything new.
How do I stop things sliding around in a drawer?
Use a non-slip liner or a fitted tray. Make sure items are not overfilled, which can cause shifting.
Where should I keep sharp knives?
Use a knife block, in-drawer tray, magnetic strip or blade guards, and keep them away from children. Dry knives before storing.
Should I group by type or by task?
Grouping by task usually saves time, since related tools are together. Grouping by type works for cutlery and similar sets.
How often should I declutter my drawers?
A check every few months is enough for most households. Do it sooner if drawers become hard to close.
What should go in the junk drawer?
Keep it small and limited to a few useful items such as tape, scissors and batteries. Use a tray to separate categories and review it regularly.
The Short Version
Empty, sort, group by task, measure, and add dividers. Keep daily tools near where you use them, store sharp items with care, and revisit the drawers now and then.